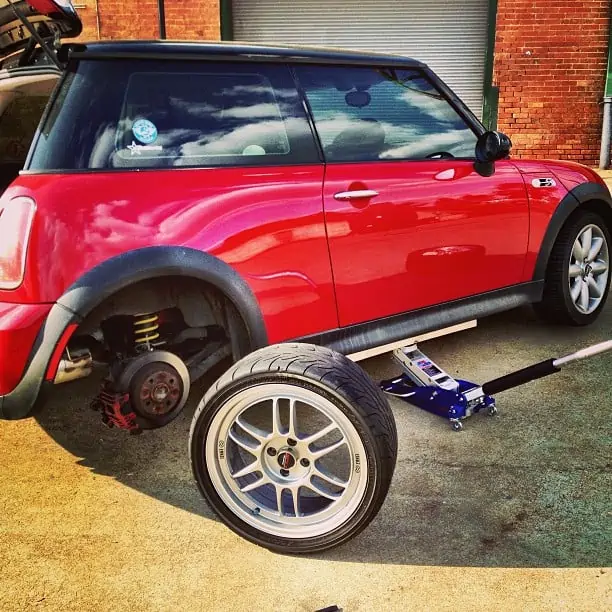
One of the most valuable and essential tools that every car owner or person working in the automotive industry should have is a floor jack. A floor jack is a manually operated hydraulic lift used for partially elevating one side of a car or truck from the ground when doing maintenance or repairs.
It usually comes in handy when you need to change the engine oil, when you need to change your winter tires, or if you need to remove a flat tire. While you may feel tempted to leave the work to a professional, you can save tons of money by learning how to make minor repairs and adjustments yourself with a floor jack.
Knowing how to use a floor jack is an important skill every car owner should possess, as it makes the process of lifting a vehicle relatively easy. Floor jacks are not as complicated to use as some of the other jacks. Anyone can use them, but vehicles are heavy, and without proper knowledge of how to use a floor jack, severe injuries and damages can occur.
Using a floor jack appropriately requires a combination of common sense and accurate technique. This article provides a step by step guide on how to use a floor jack effectively. It also explains how you can protect yourself and prevent any cases of vehicle damage or potentially fatal injuries that may occur when using a floor jack.
Step 1: Prepare the Floor Jack
New floor jack and torque wrench coming in handy by Josh Tremper / CC BY-ND 2.0
As the saying goes, failing to plan, is planning to fail. Before using a floor jack, you must make adequate preparations in advance. Failure to do so would mean putting your vehicle at risk of damage and your self in danger. Ensuring adequate preparedness involves making sure that you observe the following basic protocols:
- Put on your protective gear. This may include clothing such as coveralls, gloves, eye goggles, and sturdy footwear.
- Visually inspect the floor jack to ensure that it is securely resting on a solid, level, and debris-free surface. Under no circumstances should you attempt to jack up a vehicle on an uneven or soft surface such as grass or sand.
- Check if the floor jack has all its accessories intact. If you notice any defects, missing parts or accessories, ensure to replace them before using the floor jack. Also, pay close attention to the jack’s valve, especially when lifting, as it may cause problems if it’s loose, leaks pressure, or is damaged.
- Test the floor jack first with your hand or foot before using it. Ensure that it engages and disengages properly. Also, make sure that it raises, holds and releases efficiently.
- Check the maximum weight capacity of the floor jack before its first use and ensure that it is in tandem with your vehicle’s weight. The max weight is usually indicated on the label of the floor jack. Also, take out all extra luggage or heavy items to release any excess load that may be imposed on your vehicle’s original weight and keep it as light as possible.
Note: Most of these accessories are entirely optional, but they can add an extra layer of safety.
Step 2: Identify the Right Jack Points
This step requires precise concentration and careful positioning to execute successfully. First of all, park your vehicle on a flat and even surface, ideally on a concrete driveway. Make sure the parking brake is fully engaged, and then balance the load on the jack’s saddle by attaching the saddle directly to the jack points located on the crossmember before lifting the vehicle.
- Jack points are the locations underneath the vehicle where you get the best leverage and where the floor jack can be inserted. They are designed to be strong enough to sustain the vehicle’s weight when lifted.
- The crossmember is the long metal support beam that runs underneath from the front fender to the rear fender on both sides of the vehicle.
- The saddle is the round metal part of the floor jack that moves upward as you pump up the floor jack. It is typically nestled into the vehicle frame with as much even contact as possible.
Always ensure that you attach the floor jack to the right jack point. Some people tend to be negligent of this step in the process, and they wind up inserting the floor jack wrongly. The floor jack must be affixed directly underneath the load and not at an angle. If the floor jack feels wobbly at any point in this process, stop immediately and replace it. An unbalanced load can tilt dangerously to the heavier side of the vehicle as the floor jack transforms, putting your vehicle at risk of damage or potentially fatal injuries to yourself during lifting.
Also note that jack points vary from one vehicle to the other, so if you’re unsure where to attach the floor jack, we advise that you refer to your vehicle manual for the factory-approved jack points. If you’ve misplaced your car manual, you can go online and watch tutorial videos or how-to guides for quick and easy reference. The internet is a valuable resource and there are multitudes of dedicated guides available for your specific vehicle.
In most cases, you will readily find a car’s jack points either at the back or front wheels. Each jack point has a metal edge on the crossmember where you can insert the floor jack before lifting, so check carefully for it. You can also purchase soft rubber jack pads and install them on your floor jack to help prevent scratches and bending on your vehicle’s jack points.
Tip: you can use a double pump piston jack if you’re in a hurry and want to get the floor jack to reach the jack points much faster. With regular floor jacks, Pascal’s laws of hydraulics typically set in once under the load, restraining the floor jack from lifting on both the up and downstroke. Double pump piston jacks, on the other hand, circumvents one of their pumps under the load and allows you to lift on the downstroke.
Step 3: Use Wheel Chocks
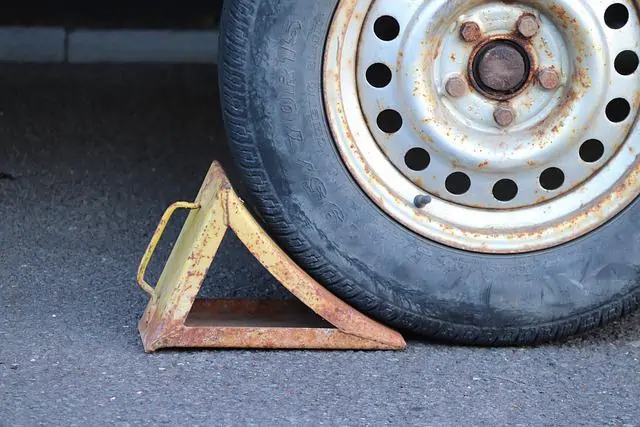
Once you’ve identified where you’re going to insert your floor jack, the next step is to ensure that your vehicle is firmly secured to prevent it from rolling when you start to jack it up and while working on it. This is done by placing wheel chocks to both sides of the tires at the end of the vehicle you will NOT be lifting. For instance, if you’re working on the front end of the vehicle, make sure that the wheel chocks are placed on the back end.
Wheel chocks are among the most reliable accessories to use with a floor jack. They provide a solid grip on your vehicle’s tires before and after it is lifted. Using wheel chocks is especially important if you’re working on the back end of the vehicle where the parking brake is most likely to be located. The front wheels are still prone to roll if you jack up the back end of the vehicle, so always slip the wheel chocks underneath your tires before lifting the vehicle and make sure they fit snuggly.
Step 4: Use Jack Stands to Hoist the Vehicle
You can now proceed with hoisting the vehicle. Place the floor jack directly under one of the recommended jack points indicated in the vehicle manual. Once it is fitted, push down on the lever of the floor jack to lift the saddle upward. Continue pushing and lifting the vehicle upward until you have attained your desired height. Lift the vehicle in slow motion and make it high enough for you to comfortably access the parts underneath and properly complete your necessary maintenance or repair work.
Another accessory you should have when using a floor jack is a jack stand. Jack stands are designed to support the vehicle and prevent it from falling if the floor jack fails. Place two jack stands underneath the recommended jack points and adjust them to the appropriate height. Although it is common to see people use floor jacks as a dolly, this practice is risky as the vehicle can shift or slip off the saddle and collapse. Floor jacks are only meant for lifting the vehicle; using them as a dolly can cause undue strain and damage to the floor jack and its components.
Jack stands are made to support the vehicle and relieve the floor jack of some weight. So ensure that the jack stands are tightly fitted underneath the jack points and resting on a hard, level surface free of debris. Use your hands to test the jack stands to make sure they are secure, and adjust the saddle of the floor jack as necessary to place the jack stands up to the jack points perfectly. Also, give the vehicle a gentle shove after you have fitted the jack stands to ensure it is stable. Do this until it meets all safety specifications before you begin working underneath it.
Step 5: Remove the Floor Jack
Remember that a floor jack should only be used for lifting, and when the load is in position, you can use jack stands to support it. Once you’re done fitting the jack stands on the jack points of the crossmember, ensure the vehicle is well balanced by shoving it a bit with your hands to test for sturdiness, then slowly release the floor jack and keep it aside.
Once the floor jack is removed, nudge the vehicle again to make sure the jack stands are firmly in place before you begin whatever work needs to be done and even before attempting to situate yourself under the vehicle. For more security and to protect yourself while working, you can place wooden blocks underneath the vehicle close to the jack points. Make sure that the wooden blocks are sitting on level, solid ground.
Avoid using materials that can be crushed easily by the vehicle’s weight, such as bricks or cinder blocks. Also, pay close attention to your work surface, especially if you’re working on asphalt, which has a high possibility of getting soft when the weather is hot. Under no circumstances should you risk working on an uneven or soft surface. Your work surface should be sturdy such that the floor jack and jack stands will not start sinking when in use.
Safety should be your priority when using a floor jack, as doing a job well means doing a job safely. Once you’re done with the work, carefully pull yourself from under the vehicle and release the jack stands to return the vehicle to its original position.
Using a floor jack should be a simple and straightforward task for anyone that knows how to drive a vehicle. By following each of the steps outlined above, you should be able to use a floor jack like a pro in no time. Before you know it, you’ll be completing routine maintenance tasks and repairs on your vehicle yourself.
Conclusion
The proper use of a floor jack is highly dependent on your work surface. Even if your vehicle gets caught up on a soft or uneven surface, you have to make sure that it is on a solid surface before you begin using a floor jack.
Floor jacks will enable you to carry out routine maintenance and repairs for your vehicle quickly. By following the steps and applying the knowledge shared in this article, you will save yourself on the valuable time and cost that would have needlessly been spent on doing minor repairs at an automobile shop.
Whenever you are using a floor jack, always ensure that you take the necessary precautionary measures outlined above before going underneath the vehicle. Another important tip is to always have more than one jack stand supporting the vehicle. This will ensure that the vehicle is held safely in position in the event one of them fails.

Jim Wicks is the founder of MotorVehicleHQ. With over two decades of experience in the automotive industry and a degree in Automotive Technology, Jim is a certified car expert who has worked in various roles ranging from a mechanic, car dealership manager, to a racing car driver. He has owned more than 20 cars over the past 15 years. Ask him about any vehicle you see on the road and he can tell you the make, model and year. He loves the aesthetics of all things cars, and keeps his vehicles in pristine condition.
In his free time, Jim enjoys getting his hands dirty under the hood of a classic car or taking long drives along the country roads. His favorite car? A 1967 Shelby GT500, a true classic that, according to Jim, “represents the pure essence of American muscle.”


